SagaciousZed (talk | contribs) (→Configuring your permissions: add wiki link to plugin.yml) |
ChrisGWard (talk | contribs) m (Unused import) |
||
| Line 152: | Line 152: | ||
<blockquote><source lang="java">package {$TopLevelDomain}.{$Domain}.{$PluginName}; |
<blockquote><source lang="java">package {$TopLevelDomain}.{$Domain}.{$PluginName}; |
||
| − | import java.util.logging.Logger; |
||
import org.bukkit.plugin.java.JavaPlugin; |
import org.bukkit.plugin.java.JavaPlugin; |
||
Revision as of 11:13, 24 January 2013
|
Working on it...
|
Introduction
This rather large tutorial aims to get you started with plugin development in Bukkit. It is in no way a complete tutorial of all possibilities in Bukkit, but rather a general overview of the basics. It starts with making sure you understand Java, sets up your workspace in an IDE, and introduces the essentials of most Bukkit plugins.
Learning Java
These tutorials require basic knowledge of the Java programming language. If you know nothing or too little about Java then you should check out the tutorials below, as they might help you a lot!
Video Java Tutorials
- iTechRemix Very basic Bukkit plugin tutorials by iTechRemix.
- Thenewboston - Lots of great videos here.
- JavaVideoTutes.com - Covers a lot of topics.
Written Java Tutorials
- Oracle Documentation (Company that currently supports Java)
- Java2s.com - Pretty much everything possible in Java here
- Java 101 - In depth, written tutorials
- For more resources, see Portal:Developers
The Development Environment
Before developing a plugin (or learning Java) you will need to set up a development environment. This includes but is not limited to installing an IDE (Integrated Development Environment). The following tutorial contains instructions for the Eclipse IDE.
- For further information, see Setting Up Your Workspace
Starting a Plugin Project
Create a Project
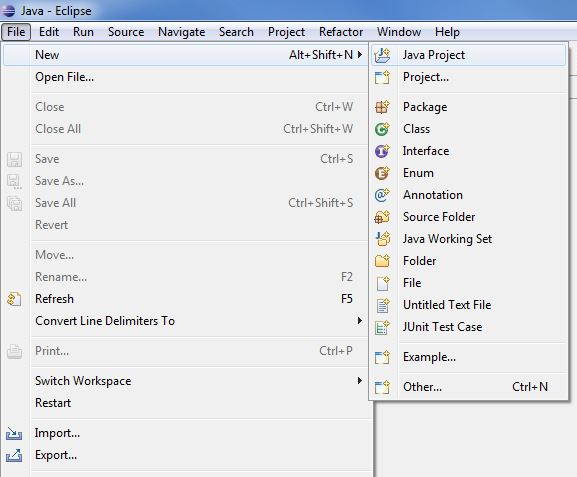
Before starting, you'll need to set up your workspace and files in Eclipse. Start Eclipse, then create a new Project by selecting File > New > Java Project:
Name the project whatever you want, then run through the new project wizard, following the instructions on screen. A folder will appear in the package explorer pane on the left hand side; "left-click" on the little arrow beside it to show the contents of your project.
Reference the Bukkit API
Before you begin developing your plugin you will need to add the bukkit API library to your project as an external JAR, you can also add any other API's you may want to use.
The latest compiled Bukkit API jar can be downloaded from here: Bukkit API - Development Snapshot
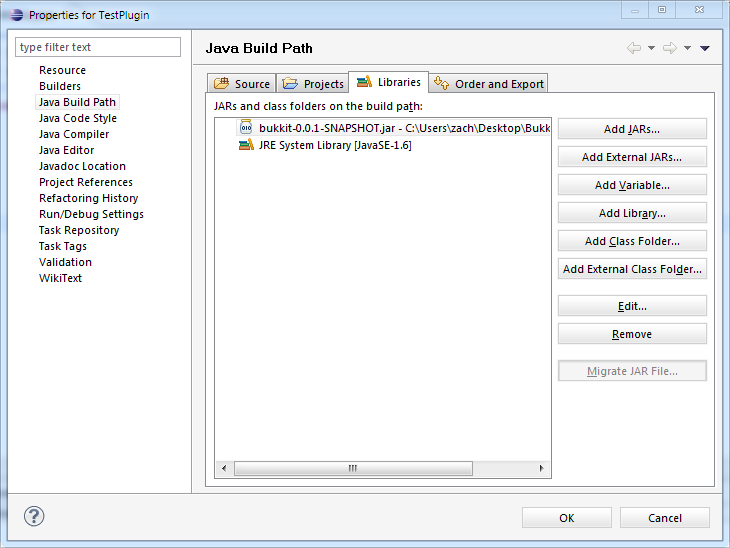
Right click on the folder with the name of your project in the Package Explorer pane on the left hand side of the screen and choose Properties. Select Java Build Path from the box of options on the left and the dialog inside the properties box should change. Click Add External JARs and browse to wherever you downloaded the Bukkit API.
Bukkit Javadocs
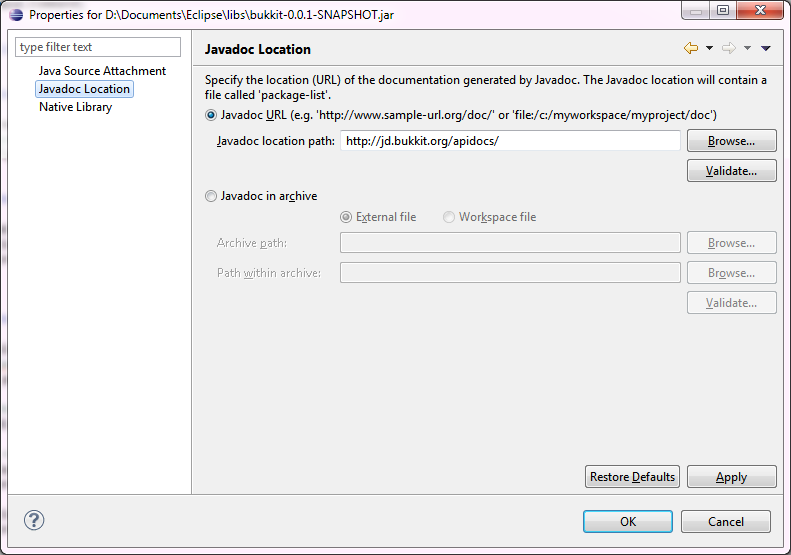
If you have some experience with Eclipse and Java you will know that when you hover your mouse over any built in class or method a yellow box will pop up, containing the documentation for that class or method. This is known as a Javadoc and can also be accessed online at the Oracle website. Bukkit also has documentation which often contains useful descriptions of each method and class provided by the API, which is available here. In order to have this information available within Eclipse, so that it will pop up whenever you hover over a Bukkit method or class, first right click on the Bukkit jar where it appears under "Referenced Libraries" in the project explorer, and select "Properties". Choose the "Javadoc Location" item on the left of the window that pops up, and paste the url http://jd.bukkit.org/apidocs/ into the textbox under "Javadoc URL". It should look like this:
Click validate, and then click OK. Done! Now the Bukkit Javadocs are linked to the Bukkit source, and you can access helpful documentation from within Eclipse.
Creating a package
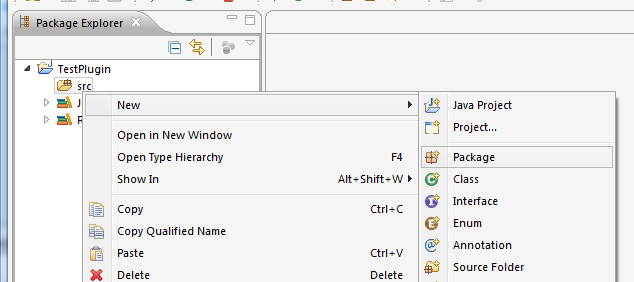
Now you need to create a 'package' which will store all the Java class files we will be using. Right click on the folder labelled "src" and select New > Package:
Name your package as follows:
- If you have a domain name, the package would be the domain name in reverse.
- Ex: i-am-a-bukkit-developer.com your package would be com.i_am_a_bukkit_developer source
- Avoid using a domain you do not own.
- No domain? Here are some common conventions
- Create an account on a source control site such as github or sourceforge
- For github, follow the instructions here and you will have a sub-domain, so your package would be com.github.<username>
- For github, follow the instructions here and you will have a sub-domain, so your package would be com.github.<username>
- Use your email. Ex: <username>@gmail.com would be com.gmail.<username>
- This is the least preferred method. Simply use any unique package naming, again, use this as your last resort.
- Create an account on a source control site such as github or sourceforge
There are several things that your package must not begin with and those are:
- org.bukkit
- net.bukkit
- com.bukkit
- net.minecraft
Once you have the base package name, you will want to finish it off with the plugin name. Lets use the github pages example for this. If you are creating a plugin called "TestPlugin" your full package name would be "com.github.<username>.testplugin".
Creating the Plugin's Class
Now that we have our project set up we can start to add class files and begin making our plugin. The plugin's main class is the class that extends JavaPlugin. There should only ever be one class in your plugin that extends JavaPlugin either directly or indirectly. It's always good practice to create your main class first and give it the same name as your plugin. Right click on the package you created before, and select New > Class. You should have a new class similar to the following
package {$TopLevelDomain}.{$Domain}.{$PluginName};

import org.bukkit.plugin.java.JavaPlugin;

public final class {$PluginName} extends JavaPlugin {

}
| Plugins should never invoke their constructor and create new instances |
Creating plugin.yml
You have now set up the main file and your project. To allow bukkit to 'see' it we need to add the plugin.yml file. This file will contain essential information, and without it your plugin will NOT work. This time we want to right click on the project folder, NOT "src". Select New > File. Name the file "plugin.yml" and click ok. Eclipse will open your currently blank plugin.yml file in the default text editor. (Hint: If you want to keep your workspace organised close the text editor and drag the plugin.yml file onto the main workspace(To the right) and you will be able to edit the file inside eclipse.) There are three essential things that need to be declared in this file; the name of your plugin, the fully qualified name of the plugin's main class, and the version of your plugin. The most simple plugin.yml file would look like this :
name: {$PluginName}
main: {$PackageName}.{$MainClass}
version: {$VersionNumber}
 Note: The package name for plugins often includes the plugin name so don't be surprised to see <pluginname>.<pluginname> at the end of the second line!
- Note: Your main class may or may not be the name of your plugin depending on what you named it earlier, keep in mind this is case-sensitive.
At this point your plugin can be loaded by Bukkit, and will be accompanied with log entries indicating this. but it will do nothing!
onEnable() and onDisable()
These methods are called whenever the plugin is enabled and disabled. By default your plugin will automatically enable itself when loaded so you can register your events and provide some debug output here. onEnable() is invoked when the plugin is enabled, and should contain logic to set up your plugin when it is enabled. onDisable() is invoked when a plugin is disabled, and should contain logic to clean up your plugin and associated state. Additionally plugins can override the onLoad() method to perform additional logic when the plugin loads but
Introduction to onEnable() and onDisable()
Create the methods onEnable() and onDisable() inside the main class created in the previous section. It will look something like the following
package {$TopLevelDomain}.{$Domain}.{$PluginName};

import org.bukkit.plugin.java.JavaPlugin;

public final class {$PluginName} extends JavaPlugin {

    @Override
    public void onEnable(){
        // TODO Insert logic to be performed when the plugin is enabled
    }

    @Override
    public void onDisable() {
        // TODO Insert logic to be performed when the plugin is disabled
    }
}
The methods now exist, but they don't do anything yet. Note: There is no reason to print a message such as "{$PluginName} has been enabled!" as bukkit will do this automatically.
Logging a message
A plugin can print a message to the console and the server log. It can accomplish this by invoking the correct method from the plugin's logger. First we must invoke the getLogger() method to retrieve the logger associate with this plugin. Then we can start logging.
We will write to the log when onEnable() method is called. We can do that by inserting the following line into the onEnable() method.
getLogger().info("onEnable has been invoked!");
You can then do the same inside onDisable(), making sure to change the message.
Your main class should now look something like this:
package {$TopLevelDomain}.{$Domain}.{$PluginName};

import org.bukkit.plugin.java.JavaPlugin;

public final class {$PluginName} extends JavaPlugin {

	public void onEnable(){
		getLogger().info("onEnable has been invoked!");
	}

	public void onDisable(){
		getLogger().info("onDisable has been invoked!");
	}
}
Listeners
Listeners are classes whose methods are invoked in response to an event. All listeners implement org.bukkit.event.Listener. For further details about creating listeners,
- Please See: Event API Reference
Commands
The onCommand() Method
So, you now know how to register events and do something when they happen, but what if you only want something to happen when a command is typed? You use onCommand. This code is run whenever a player types a command preceded by the "/" character. E.g. typing "/do something" would call the onCommand method. In this case nothing would happen because no behaviour has been programmed.
Avoid using command names that are the same as those that come with Bukkit, and also consider carefully how unique your commands names will be. E.g. the "give" command is already used by several plugins, and if you implement yet another "give" command, your plugin will become incompatible with those other plugins. You must register your commands in the plugin's plugin.yml or they will not trigger this method.
The onCommand method must always return a boolean value - either true or false. If the value returned is true then you won't see any noticable events. However if it returns false then the plugin will revert to your plugin files' 'usage: property' and display a message to the user showing them how to use the command as specified in the plugin.yml file.
When using onCommand, you should always register 4 parameters.
CommandSender sender- who sent the command
Command cmd- the command that was executed
String commandLabel- the command alias that was used
String[] args- an array of additional arguments, e.g. typing /hello abc def would put abc in args[0], and def in args[1]
Setting up the command
public boolean onCommand(CommandSender sender, Command cmd, String label, String[] args){
	if(cmd.getName().equalsIgnoreCase("basic")){ // If the player typed /basic then do the following...
		// doSomething
		return true;
	} //If this has happened the function will return true.
        // If this hasn't happened the a value of false will be returned.
	return false;
}
When coding the onCommand function it is always good practice to return false at the very end of the function. Returning false will display the usage dialog set in plugin.yml (see below). This way if anything goes wrong the help message will be displayed. When returning a value the function will exit so if you return true any code underneath won't be run, unless a return statement is nested in a if statement or similar.
The .equalsIgnoreCase("basic") just means that it won't distinguish between upper and lower case characters. For example, the string "BAsIc" and "BasiC" would both equal basic and the code would be executed.
Adding your Command to the Plugin.yml
You will also need to add the command to your plugin.yml file. Add the following to the end of plugin.yml:
basic- the name of the command.
description- the description of the command .
usage- the help dialog that users will see when you return false in theonCommandmethod. Write clearly, so that others can discern what the command is and how to use it.
permission- This is used by some help plugins to work out which commands to show to the user.
permission-message- This is output when the player attempts but does not have permission to use the command.
Note that yml files use 2 spaces for tabs, as the tab character will cause problems.
Console Commands vs. Player Commands
You may have noticed the CommandSender sender parameter above. CommandSender is a Bukkit interface which has two useful (for plugin writers) subclasses: Player and ConsoleCommandSender.
When you're writing your plugin, it's a very good idea to ensure that commands that can be run from the console actually work, and that commands that should only be run as a logged-in player really are only run as a logged-in player. Some plugins simply return if the sender is not a player (i.e. someone tried to use the plugin's commands from the console), even when those commands make perfect sense from the console (e.g. changing the weather on the server).
One way to do this is:
public boolean onCommand(CommandSender sender, Command cmd, String label, String[] args) {
	if (cmd.getName().equalsIgnoreCase("basic")){ // If the player typed /basic then do the following...
		// do something...
		return true;
	} else if (cmd.getName().equalsIgnoreCase("basic2")) {
		if (!(sender instanceof Player)) {
			sender.sendMessage("This command can only be run by a player.");
		} else {
			Player player = (Player) sender;
			// do something
		}
		return true;
	}
	return false;
}
In this example, the command basic can be run by anyone - a logged-in player, or the server operator on the console. But the command basic2 can only be run by logged-in players.
In general, you should allow as many commands as possible to work on both the console and for players. Commands that need a logged-in player can use the mechanism in the example above to check that the CommandSender is actually a player before continuing. Such commands would generally depend on some attribute of the player, e.g. a teleportation command needs a player to teleport, an item giving command needs a player to give the item to...
If you want to get more advanced, you could do some extra checks on your command arguments so that e.g. a teleportation command could be used from the console if and only if a player's name is also supplied.
Using a separate CommandExecutor class
The examples above just put the onCommand() method into the plugin's main class. For small plugins, this is fine, but if you're writing something more extensive, it may make sense to put your onCommand() method into its own class. Fortunately, this isn't too hard:
- Create a new class within your plugin's package. Call it something like MyPluginCommandExecutor (although of course replacing MyPlugin with your plugin's actual name). That class must implement the Bukkit CommandExecutor interface.
- In your plugin's
onEnable()method, you need to create an instance of your new command executor class, and then make a call likegetCommand("basic").setExecutor(myExecutor);, where "basic" is the command we want to handle, andmyExecutoris the instance we created.
Best explained by example:
MyPlugin.java (the main plugin class):
@Override
public void onEnable() {
	// ...

	// This will throw a NullPointException if you don't have the command defined in your plugin.yml file!
	getCommand("basic").setExecutor(new MyPluginCommandExecutor(this));

	// ...
}
MyPluginCommandExecutor.java:
public class MyPluginCommandExecutor implements CommandExecutor {

	private MyPlugin plugin; // pointer to your main class, unrequired if you don't need methods from the main class

	public MyPluginCommandExecutor(MyPlugin plugin) {
		this.plugin = plugin;
	}

	@Override
	public boolean onCommand(CommandSender sender, Command cmd, String label, String[] args) {
		// implementation exactly as before...
	}
}
Notice how we pass an instance of the main plugin to the constructor for MyPluginCommandExecutor. This allows us easy access to the main plugin's methods if we need to.
By doing this, we can better organise our code - if the main onCommand() method is large and complex, it can be split into submethods without cluttering up the plugin's main class.
Note that if your plugin has multiple commands, you will need set the command executor for each command individually.
Writing a safe onCommand
When writing a onCommand, it's important that you don't assume any information, such as the sender being a Player. Things to keep in mind:
Make sure the sender is a Player before casting
Using simple code like this makes it possible:
public boolean onCommand(CommandSender sender, Command cmd, String label, String[] args){
	if (sender instanceof Player) {
           Player player = (Player) sender;
           // do something
        } else {
           sender.sendMessage("You must be a player!");
           return false;
        }
        // do something
        return false;
}
Check the arguments length
Don't always assume the sender typed the correct amount of arguments.
public boolean onCommand(CommandSender sender, Command cmd, String label, String[] args){
	if (args.length > 4) {
           sender.sendMessage("Too many arguments!");
           return false;
        }
        if (args.length < 2) {
           sender.sendMessage("Not enough arguments!");
           return false;
        }
}
When getting another Player by their name, make sure they are online
Sometimes you want to get another player by the name entered by the player. Always make sure the player is online!
public boolean onCommand(CommandSender sender, Command cmd, String label, String[] args){
	Player target = (Bukkit.getServer().getPlayer(args[0]));
        if (target == null) {
           sender.sendMessage(args[0] + " is not online!");
           return false;
        }
        return false;
}
If you need to modify a Player currently not online, the OfflinePlayer class provides basic manipulation methods
Plugin Configuration/Settings
The Bukkit API provides a convenient way for plugins to manage user configurable settings. Additionally it also serves as an easy way to store data.
- Please see: Configuration API Reference
Permissions
With the new Bukkit API for permissions, they couldn't be easier. To find out if a player has a particular permission use the following:
if(player.hasPermission("some.pointless.permission")) {
   //Do something
}else{
   //Do something else
}
You can also find if a permission has been set or not (equivalent to Java's null) with the following function:
boolean isPermissionSet(String name)
You may be wondering why there aren't any groups. The answer to that is because they aren't really needed. Previously one of the main uses for groups was to format chat messages. That however can be done just as easily with permissions. Inside your chat plugin's config you would define associations between permissions and prefixes. For example the permission "someChat.prefix.admin" would correspond to the prefix [Admin]. Whenever a player speaks with that permission their name will be prefixed with [Admin].
Another common usage might be to send a message to all users within a group. Again however this can be done with permissions with the following:
for(Player player: getServer().getOnlinePlayers()) {

    if(player.hasPermission("send.recieve.message")) {
        player.sendMessage("You were sent a message");
    }

}
Finally you may be asking, well how do I set and organise player's permissions if there are no groups? Although the bukkit API doesn't provide groups itself, you must install a permission provider plugin such as permissionsBukkit to manage the groups for you. This API provides the interface, not the implementation.
Configuring your permissions
If you want more control over your permissions, for example default values or children then you should consider adding them to your plugin.yml. This is completely optional, however it is advised. Below is an example permissions config that would be appended to the end of your existing plugin.yml:
Firstly, each permission your plugin uses is defined as a child node of the permissions node. Each permission can then optionally have a description, a default value, and children.
Defaults
By default when a permission isn't defined for a player hasPermission will return false. Inside your plugin.yml you can change this by setting the default node to be one of four values:
- true - The permission will be true by default.
- false - The permission will by false by default.
- op - If the player is an op then this will be true.
- not op - If the player is not an op then this will be true.
Children
Before now you will probably be used to the * permission to automatically assign all sub permissions. This has changed with the bukkit API and you can now define the child permissions. This allows for a lot more flexibility. Below is an example of how you do this:
permissions:
    doorman.*:
        description: Gives access to all doorman commands
        children:
            doorman.kick: true
            doorman.ban: true
            doorman.knock: true
            doorman.denied: false
Here the doorman.* permission has several child permissions assigned to it. The way child permissions work is when doorman.* is set to true, the child permissions are set to their values defined in the plugin.yml. If however doorman.* was set to false then all child permissions would be inverted.
Setting your own permissions
If you wish to know about developing your own permissions plugins (Ones that actaully set permissions) then check out the tutorial on Developing a permissions plugin.
Scheduling Tasks and Background Tasks
Currently, Minecraft servers operate nearly all of the game logic in one thread, so each individual task that happens in the game needs to be kept very short. A complicated piece of code in your plugin has the potential to cause huge delays and lag spikes to the game logic, if not handled properly.
Luckily, Bukkit has support for scheduling code in your plugin. You can submit a Runnable task to occur once in the future, or on a recurring basis, or you can spin off a whole new independent thread that can perform lengthy tasks in parallel with the game logic.
There is a separate Scheduler Programming tutorial which introduces the Scheduler, and gives more information on using it to schedule synchronous tasks, and on kicking off asynchronous tasks in Bukkit.
Block Manipulation
The easiest way to create blocks is to get an existing block and modify it. For example, if you want to change the block that is located five blocks above you, you would first have to get that block and then modify it. As an example in reaction to a player move event:
public void onPlayerMove(PlayerMoveEvent evt) {
	Location loc = evt.getPlayer().getLocation();
	World w = loc.getWorld();
	loc.setY(loc.getY() + 5);
	Block b = w.getBlockAt(loc);
	b.setTypeId(1);
}
Going over this code we can see that it will change the block that is five blocks above the player to stone whenever the playerMove() event is triggered. Firstly we get the players location, then we get the world from the location. We then modify the co-ordinates of the location by adding five. Now that we have a location and the world we can create a block variable which will hold the block at the location. We get this by using the world and location in w.getBlockAt(loc);. Finally, we have the block at the location so we can change its ID or even its block data if we wanted to. Block data is specified by a byte so you would have to cast whatever value you set to a byte. For example in addition to the code above you could add b.setData((byte)3);
You can use this to generate buildings and individual blocks programmatically by the use of algorithms. For example to generate a solid cube we could simply make an algorithm with three nested for loops.
public void generateCube(Location loc, int length){  // public visible method generateCube() with 2 parameters point and location
	World world = loc.getWorld();

	int x_start = loc.getBlockX();     // Set the startpoints to the coordinates of the given location
	int y_start = loc.getBlockY();
	int z_start = loc.getBlockZ();
        /* Note: used getBlockX() instead of getX() because it returns an int value and avoid the cast with (int)loc.getX() */

	int x_length = x_start + length;    // now i set the lengths for each dimension... should be clear.
	int y_length = y_start + length;
	int z_length = z_start + length;

	for(int x_operate = x_start; x_operate <= x_length; x_operate++){
		// Loop 1 for the X-Dimension "for x_operate (which is set to x_start)
		//do whats inside the loop while x_operate is
		//<= x_length and after each loop increase
		//x_operate by 1 (x_operate++ is the same as x_operate=x_operate+1;)
		for(int y_operate = y_start; y_operate <= y_length; y_operate++){// Loop 2 for the Y-Dimension
			for(int z_operate = z_start; z_operate <= z_length; z_operate++){// Loop 3 for the Z-Dimension

                                // get the block with the current coordinates
				Block blockToChange = world.getBlockAt(x_operate,y_operate,z_operate);
				blockToChange.setTypeId(34);    // set the block to Type 34
			}
		}
	}
}
This method will construct a 3D cube or cuboid with the given length and starting point. As for deleting blocks simply follow the same method for creating them but set the ID to 0 (air).
(Player) Inventory Manipulation
This section mostly covers player inventory manipulation, but the same applies to chest inventory manipulation as well if you find out how to get a chest's inventory :P. Here is a simple example of inventory manipulation:
public void onPlayerJoin(PlayerJoinEvent evt) {
    Player player = evt.getPlayer(); // The player who joined
    PlayerInventory inventory = player.getInventory(); // The player's inventory
    ItemStack itemstack = new ItemStack(Material.DIAMOND, 64); // A stack of diamonds

    if (inventory.contains(itemstack)) {
        inventory.addItem(itemstack); // Adds a stack of diamonds to the player's inventory
        player.sendMessage("Welcome! You seem to be reeeally rich, so we gave you some more diamonds!");
    }
}
So inside onPlayerJoin we first make a few variables to make our job easier: player, inventory and itemstack. Inventory is the player's inventory and itemstack is a ItemStack that has 64 diamonds. After that we check if the player's inventory contains a stack of diamonds. If the player has a stack of diamonds, we give him/her another stack with inventory.addItem(itemstack) and send a message. So inventory manipulation isn't actually that hard, if we wanted we could remove the stack of diamonds by simply replacing inventory.addItem(itemstack) with inventory.remove(itemstack) and change the message a little bit. Hopefully this helped!
Item Manipulation
When dealing with items in the code, you use the ItemStack class for looking up and setting all information on that stack.
Enchantments
To enchant an item you must first know the Item Code and the Effect ID. Enchantments themselves cannot be instantiated (new Enchantment() won't work) because they're abstract, so you must use an EnchantmentWrapper. You can not enchant items which are not normally enchantable, on SMP because bukkit servers aren't set up to send enchantment information on not enchantable items. So no fire sticks.
int itemCode = 280;  //use the item code you want here
int effectId = 20;  //use the enchantment code you want here
int enchantmentLevel = 100;

ItemStack myItem = new ItemStack(itemCode);  //new item of item code
Enchantment myEnchantment = new EnchantmentWrapper(effectId);  //new enchantment of effect id
myItem.addEnchantment(myEnchantment, enchantmentLevel);  //enchant the item
Metadata
Bukkit is trying to make plugin development as easy as possible, so HashMaps with key of type Player, Entity, World or even a Block were replaced by Metadata. Metadata is some kind of alternative to HashMap. It allows you to add custom "fields" to Players, Entities, Worlds and Blocks. These things are all members of Metadatable class(check [1])It works very simply. Everything what is Metadatable holds its own HashMap of Metadata which you have access to. That means, if you're for example creating economy plugin, you need a HashMap of Player and Float or Double. With Metadata, you don't have to! You just attach to player new metadata value, and that's it!
Why to use Metadata
Metadata is all handled by Bukkit, what makes it very good alternative to HashMaps.
Metadata can be used to share info between plugins.
Why not to use Metadata
Slightly more difficult to get the value.
It is not saved on shutdown.
Getting & Setting Metadata
/* If you're having these methods in your plugin's main class (which extends JavaPlugin), you can remove parameters plugin from them,
 * and in the FixedMetadataValue constructor and getMetadata method, use "this" instead*/
public void setMetadata(Player player, String key, Object value, Plugin plugin){
  player.setMetadata(key,new FixedMetadataValue(plugin,value));
}
public Object getMetadata(Player player, String key, Plugin plugin){
  List<MetadataValue> values = player.getMetadata(key);
  for(MetadataValue value : values){
     if(value.getOwningPlugin().getDescription().getName().equals(plugin.getDescription().getName())){
        return value.value();
     }
  }
}
Note: If you're manipulating with numbers, booleans or strings, use convenient method to get the result. For example, you can use asInt, asString or asBoolean instead of value to find out the value.
Databases
Sometimes flat files aren't enough for what your looking to do, this is where databases come in. The most common database engines available on Linux/Mac/Windows machines typically run on some flavor of SQL (Structured Query Language).
Software offering SQL allow you to create databases with columns and header to identify to contents of each cell. Think of it as a spreadsheet on steroids, where every column you set up in your database can enforce rules to ensure integrity. Apart from being more organised than a simple custom data file, SQL provides faster access and better searching than flat files.
The SQL standard helps applications like Bukkit implement database storage for their data in a consistent way. Unfortunately, there's more than one SQL-ready database engine, and each has minor differences in how to configure and use it. Which one you choose may depend on your particular needs. (Some plugins even offer configurable options to connect to multiple database engines!)
SQLite
Alta189 has written a fantastic SQLite tutorial which I suggest you watch if you're interested in using SQL in your plugins, included with the tutorials is a handy library you can download and import to make using SQL easier. Once you have watched these video tutorials I would suggest you go and learn some SQL syntax, it's very straightforward and shouldn't take you long to pick up. SQL Tutorials @W3Schools and @1Keydata.
SQLite is great for very simple databases, because there's no server concerns to set up. Just make a few calls to create a new database and table. It's easy to back up: just copy the whole database file in one go. SQLite is a little bit weaker at data integrity, flexibility in data types, and it may not be something you would want to trust for huge databases of millions of rows. But for a new plugin in development, it's often easiest and fastest to get the SQL basics squared away with SQLite, even if you "graduate" to a more server-class database engine later.
MySQL
Another popular SQL database engine is called MySQL. It is closer to server-grade than SQLite, where many popular companies or websites depend on it for millions of webpage hits every day. With that security comes a little bit steeper learning-curve, because MySQL has more tunable parameters and capabilities.
The coding for plugins accessing MySQL is mostly the same as tiny SQLite or mega-sized Oracle, with only small differences in syntax here or there. But the administration has room to grow. You may want to set up accounts and privileges inside your MySQL setup. You may want to set up SQL scripts that organize your backups and rollback to previous states.
Deploying your Plugin
Once you have written your plugin, how do you get it from a collection of source files into a working jar file that can be installed on a server? First, set up a CraftBukkit server on your local machine. To do this, visit the wiki page on Setting up a server. Next you have to export your plugin to a .jar so that you can run it on your new server. To do this in Eclipse, click File > Export. In the window that pops up, under "Java", select "JAR file", and click next. You will see a window that looks like this:
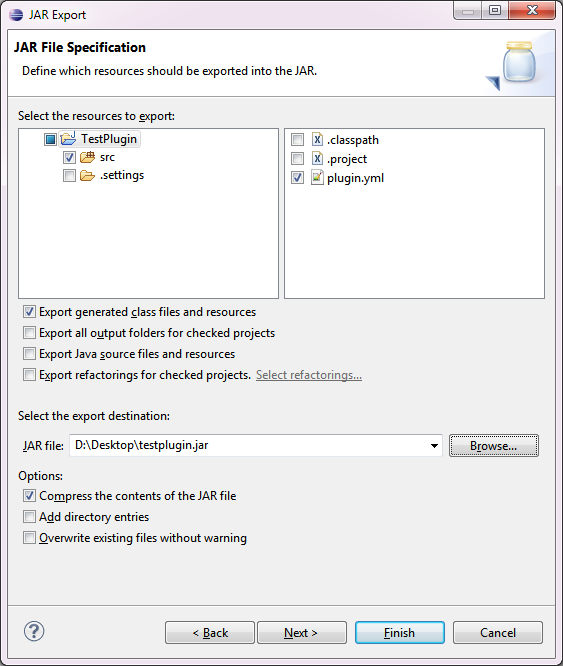
On the left, make sure that your src folder is selected. On the right, the two files beginning with a decimal point are to do with Eclipse and are not important to your plugin, so deselect them. It is vital that plugin.yml is selected in order for your plugin to work. Export your JAR file to any destination you like, but make sure you know where it is.
The jar file you have exported should now be a working plugin! Assuming of course that there are no errors in your code or your plugin.yml file. You can now drop the jar file you have exported into your bukkit server's "plugins" folder, reload or relaunch the server, and test away! In order to connect to a server running locally on your computer, simply put "localhost" as the IP address of the server in Minecraft multiplayer. If you run into errors that you can't solve for yourself, try visiting the plugin development forum, asking in the bukkitdev IRC channel, or re-reading this wiki. Once you have a useful working plugin, consider submitting your project to dev.bukkit for consumption by the Bukkit community.
Tips and Tricks
Igniting the Player
The CraftBukkit API is capable of a lot of cool stuff. Here are some code snippets for some nice effects!
How to set someone on fire, in the context of a command:
public boolean onCommand(CommandSender sender, Command cmd, String label, String[] args){
    if(cmd.getName().equalsIgnoreCase("ignite")){
        Player s = (Player)sender;
        Player target = s.getServer().getPlayer(args[0]); // Gets the player who was typed in the command.
        // For instance, if the command was "/ignite notch", then the player would be just "notch".
        // Note: The first argument starts with [0], not [1]. So arg[0] will get the player typed.
        target.setFireTicks(10000);
        return true;
    }
    return false;
}
So if a player ran a command like /ignite Notch then if the player "Notch" was online, Notch would be set on fire!
Killing the player
To keep with the theme, here's a way to kill the player.
Use this for your onCommand method:
public boolean onCommand(CommandSender sender, Command cmd, String label, String[] args){
    if(cmd.getName().equalsIgnoreCase("KillPlayer")){
        Player target = sender.getServer().getPlayer(args[0]);
        target.setHealth(0);
    }
    return false;
}
Here is an extension to that, that will kill the player with an explosion:
float explosionPower = 4F; //This is the explosion power - TNT explosions are 4F by default
Player target = sender.getWorld().getPlayer(args[0]);
target.getWorld().createExplosion(target.getLocation(), explosionPower);
target.setHealth(0);
Creating an Explosion
This code produces the TNT/Creeper Visual and Audio effects. This is useful if you are cancelling the TNT explode event but still want the effects.
	public void onExplosionPrime(ExplosionPrimeEvent event){

		Entity entity = event.getEntity();

		if (entity instanceof TNTPrimed){
			TNTPrimed tnt = (TNTPrimed) entity;
			event.getEntity().getWorld().createExplosion(tnt.getLocation(), 0);

		}
	}
Hiding player from other players
This will hide the command sender from specified player. Please note the command sender will only be hidden from specified player.
public boolean onCommand(CommandSender sender, Command cmd, String label, String[] args){
    if(cmd.getName().equalsIgnoreCase("HideMe") && args.length == 1){
        Player s = (Player)sender; //Gets the Sender
        Player target = sender.getServer().getPlayer(args[0]);  //Gets the player who is supposed not to see the sender
        target.hidePlayer(s);
        return true;
    }
    return false;
}
Striking thunders where player clicks
If you click a block with fishing rod, thunder will hit the clicked block. It's a simple and funny trick.
@EventHandler
    public void onPlayerInteractBlock(PlayerInteractEvent evt){
        if(evt.getPlayer().getItemInHand().getTypeId() == Material.FISHING_ROD.getId()){
            //maximal distance between player and thunder is 200 blocks
            evt.getPlayer().getWorld().strikeLightning(evt.getPlayer().getTargetBlock(null, 200).getLocation());
        }
    }
Request Section
http://forums.bukkit.org/forums/plugin-requests.13/
Example Files and Templates
If you have any more questions on this matter, don't hesitate to visit the BukkitDev IRC channel and ask!
| Language | English • беларуская • Deutsch • español • suomi • français • italiano • 한국어 • Nederlands • norsk • polski • português • русский • lietuvių • čeština |
|---|